I am excited to share the article below with you. It's written by Ahad Raza from AR Proformance and its focus is on movement on the squash court.
Ahad Raza is:
- A Professional Athlete: A PSA touring professional and a top 10 Canadian national squash player.
- A Lifelong Student: Ahad has completed a Masters degree, worked in management at a top financial institution, obtained several coaching certifications, and strives continuously to grow his expertise daily.
- An Elite Performance Coach : Ahad mentors and coaches numerous top nationally ranked Canadian Junior athletes (on and off the court).
Ahad's mission is to:"Mentor and guide competitive athletes, fitness enthusiasts, and anyone willing and wanting to become the best versions of themselves."
Read the article below to learn to move better on the squash court ...
Move Like a Panther
Written by Ahad Raza of AR Proformance
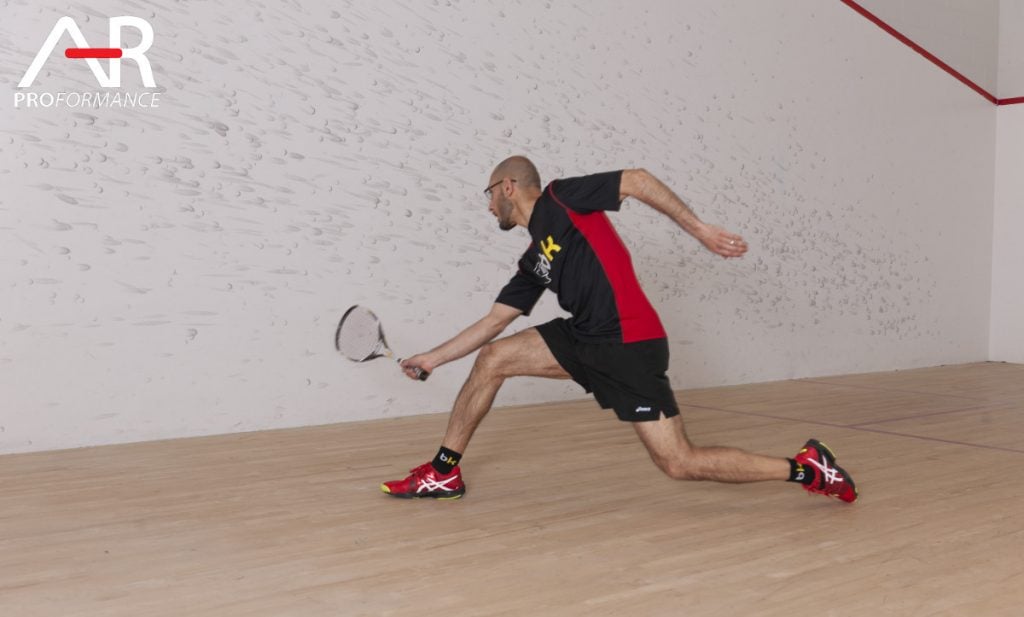
Have you ever felt sluggish on the squash court? Do you feel unstable, awkward, or just uncomfortable moving for some reason? Are you having difficulty retrieving shots that you should be able to get with ease?
I began playing squash quite late (in my late teens with commitment). One (and probably my only) strength involved movement! I played a lot of basketball as a youth, and the acceleration, explosiveness, pivoting, changing directions etc. involved in basketball helped tremendously in squash. By analyzing videos of top professionals; and eventually receiving high-level coaching, I learned more about several movement nuances. Over the years, I have coached players of all levels and ages - from recreational adults and juniors, to national junior champions and competitive adults.
In my opinion, movement is arguably the most important factor of the game. Good movers (even if they can’t hit great shots) often come out ahead of their opponents for a variety of reasons:
- They’re quicker on to the ball and off the ball (and thus on the “T” sooner).
- They get into position early, and if they know the subtleties of spacing, they can apply lots of pressure on their opponents.
- They mentally frustrate their opponents by retrieving all of their shots – resulting in attempts at hitting finer and finer winners, and more often than not, tin!
- Since they’re efficient around the court, they often don’t get as tired as others, despite having to cover a fair bit of ground (especially if their ball control is poor).
- They put less strain on their joints and thus lower their chances of injury.
Have I sold you on the importance of movement?
You may be asking how you can develop the panther-like feeling on court…well, you’re in for a treat because that’s exactly what we’re about to discuss!
Before proceeding further, I want to note that in order to maximize your movement prowess (among other things), you MUST complete a very thorough warm-up.
Movement Theory
Split Step – staggered stance and angle of the feet The split step is best described as “a small hop taken right as your opponent is about to strike the ball”. It takes advantage of the physiological “stretch shortening” phenomenon, that allows us to generate more force by first elongating a muscle before contracting it. Basically, when you take a small hop, upon landing, your calf muscles, quads and other muscles are stretched out. When a muscle is first stretched quickly (i.e. eccentric contraction) before producing a forceful concentric action, it produces more force than compared to a concentric only action from a stationary position.
Foot placement with the split step: It is very important to stagger your feet when landing during the split step. A slight stagger allows you to effectively position yourself to move off in any direction. Here’s what that looks like in several scenarios – black dot is the squash ball, blue ovals are your feet with the arrows symbolizing where your toes are pointed.

Floating "T" – hedging our bets
From the diagrams above, you’ll notice that the player’s feet (at the “T”) are not in the same position each time. Do you notice a trend? If you look closely, you’ll notice that the player on the “T” has gravitated ever so slightly towards the part of the court where the ball is being hit from.
This is precisely the idea of the floating “T”. If your opponent is hitting the ball from the back right of the court, you want to be standing slightly to the mid-right of the “T”, and slightly behind the physical “T”.
When the ball is in the front court, you want to move to the “T”, or slightly in front of it, and over marginally to the side of the court where your opponent is hitting from.

Adjusting your position slightly like this, allows you to cut off angles, and take your opponents shot early. If you’ve hit a good length, shifting over and ‘closing down the court’ will allow you to volley the ball and place lots of pressure on your opponent. This idea of shifting slightly towards the corner where the ball is being played out of refers to the concept of the Floating “T”.
Open vs. closed stance hitting
The game of squash has evolved a lot over the last few decades. In the past, largely due to older technology, equipment was very heavy. This forced players to have a large swing to generate pace. As a result, players didn’t volley much, movement patterns were not as direct as they are now, and most players hit with a ‘closed’ stance since it allowed them to remain balanced and generate pace given the heavy equipment.
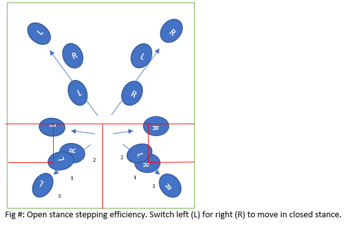
See the diagrams before for the definitions of open and closed stance hitting:

Stepping Efficiency
Now that you know how to split step, and the two ways to hit the ball (open vs. closed), you’re well on your way to moving well. The third element of amazing movement is efficiency. We’ve all experienced the feeling of running around the court like a headless chicken. It isn’t fun scurrying and scrambling. It doesn’t feel comfortable, it doesn’t look graceful, nor is it efficient!
Let’s be honest, we all do it some times, but I’d strongly encourage you to do your best to minimize that time!
Remember, regardless of which foot you’re hitting the ball off (open or closed stance), you want to get to that spot as efficiently as possible.
- Front court: 3 steps to the ball, 3 steps back to the “T” – open or closed stance.
- Mid court: 1 step, or a shuffle and lunge to the ball – generally open stance. Quick recoil back to the “T”.
- Back court: Shuffle and lunge (open stance on the forehand. Open or closed on the back hand). 2 footed stance applies on either side.
Use the image on the next page as a reference...
Application of power - First step off the “T”, and first step off your shot
Squash is a very dynamic sport, based on power endurance. Power endurance is just a fancy way of saying that we need to be able to make powerful movements repeatedly without getting tired!
As you know, we have to be able to accelerate quickly off the “T”, on to the ball, but equally as important (and this is often missed), at higher levels; due to the speed of the game and the focus on volleying, it is essential to be able to push back to the “T” after hitting a shot as quickly as possible.
Think of a spring. If we compress a spring and then release it, it explodes outward. We want to think of our first step off the “T” the same way. At the other end of the spectrum, as you step in to strike the ball, think of that movement (into the lunge) as winding up that spring. As soon as you strike the ball, release the spring and explode out of your shot! This is sometimes referred to as ‘recoil’.
In order to be powerful, we need high levels of strength (this can be developed in the gym through a variety of exercises – more on that in another report), but equally as important is timing.
As I mentioned earlier, squash is all about momentum/flow. Maintaining some degree of movement at all times, and using the momentum from our swing (among other things), allows us to move powerfully and efficiently.
In order to get maximum recoil, think about stepping into your shot, and as you’re striking the ball, begin pushing out of the shot. Your follow through will help pull or push you (depending on where you are in the court) back to the “T”. This is an advanced movement technique, so don’t worry if it doesn’t click right away.
Now that you’ve learned all of the elements you need to be a smooth and strong mover, I want to point out one thing. While going through this coaching report, you may not have paid attention to the direction the blue circles (i.e. your feet) were facing in the diagrams. But, nothing in life is arbitrary! I deliberately positioned the ‘feet’ to show you where your toes should be pointed! Please go back and review the diagrams, and practice the foot placement (with appropriate angles) as you look at the images! This is critical!
The direction of your feet (and in turn the direction of your hips) allows for balance/stability, and efficiency recoil paths back to the “T” after hitting your shots.
Spacing – the smaller movement square
Finally, let’s combine everything we’ve learned about movement. Did you know that the court is actually significantly smaller than it appears to be IF you know how to move efficiently?!
Take a look at the diagram below. The box you see in the middle of the court outlines the boundaries that you should follow when stepping. What I mean by this is that your back foot can (and should) remain inside that box (assuming you are flexible and strong enough to lunge).
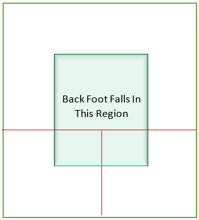
For example, when taking 3 steps into the front corners of the court, your second step (which is planted before you lunge), should fall right around the edge of the box. By looking at the court this way, the entire court can be covered in 1-2 steps followed by a lunge!
Practicing this movement concept will also prevent you from getting too close to the ball and playing a crowded (and often) poor shot. Your racquet will no longer be clanking against the side or back walls. You will find it easier to actually dig the ball out of the corners by stretching, and much more!
One caveat to note: Both feet will be placed outside the coloured box IF you CHOOSE to go into the back corners with a two-footed stance and the ball is tight to the sidewall. Remember, this is a conscious choice, and is totally fine if you know what you’re doing, and are able to push back to the “T” efficiently.
Have fun working on your movement! Don’t try and implement everything at once. Follow the questions below and see what you should work on first!
- I’m consistently getting flat-footed and unable to move off the “T” quickly – If “Yes” – work on the split step.
- I’m consistently getting too close to the ball and unable to hit a good shot – If “yes” – work on placing your back foot in the smaller movement box I taught above.
- I’m consistently running to the ball and doing something other than lunging when hitting – If “yes” – work on stepping efficiency.
- I’m setting up lots of good points with good length, or a good drop shot, but then I can’t seem to follow it up and attack the weak return quickly – If “yes” – work on the floating “T”.
- I’m getting to the ball quickly and hitting a good shot, but then I can’t get back to the “T” fast enough to take advantage of the loose ball my opponent hits back – If “yes” – work on ‘recoil’.
- I’m not getting flat-footed, but I can’t seem to accelerate on to loose shots – If “yes” – work on power off the “T” in your first step.
- I get confused about which foot to lunge with when hitting the ball – If “yes” – work on open vs. closed stance hitting.
Pick one element of movement and work on it till you’re able to execute it at least somewhat proficiently. Then add a second element, a third, and so on. You can work on most of these movement concepts through ghosting.
Ahad@arproformance.com
AR Proformance
Did you like this article from Ahad Raza? Are you interested in improving your fitness?
Check out Ahad's 5-Day #ProCoreLife Challenge. If you want to move your best on court, your fitness is critical ...
