
I've watched the Qatar Classic (2022) a little while back and noticed a particular shot that those top players seem to be able to execute repeatedly and perfectly.
That shot is the dying length.
I think the art of the dying length is quite under-appreciated in the world of squash and it's also somewhat neglected amongst amateur players (myself included), it seemed like the perfect topic for a blog post...
So, first off, what is a dying length?
I guess it's in the name, but a dying length is basically a length that dies in the back of the court by bouncing twice before reaching the back wall.
It can be played as a straight drive or a crosscourt drive and it requires a heck of a lot of accuracy to play consistently.
Just a short disclaimer, I guess that the term 'dying length' is quite general as you can play soft lengths from the back of the court that die. When I talk about a dying length, I'm talking about much more of an attacking shot that is usually played from the T or front of the court.
It's not quite a complete kill (a shot that has bounced twice by the middle of the court) but it isn't just a basic straight drive either. The objective is to try to put your opponent in a position in which they're having to scramble directly towards the back of the court from the front or the middle to get to your dying length as they can't wait for it to bounce off of the back wall.
As I mentioned in the introduction, I've been taking note of professional players' use of the dying length in the Qatar Classic. A couple of players really stand out as being able to use this shot to its full potential.
The first is Tarek Momen. Nicknamed 'The Viper', Momen is known for his incredible accuracy and ability to cut the ball in short any opportunity he gets, however, his dying length is absolutely impeccable too. He always plays it at the right time and with pinpoint accuracy.
Momen's dying length is usually played at a medium to high pace with a nice bit of cut to help the ball cling to the side wall and die faster too.
The second is Mostafa Asal, who plays his dying lengths with very high levels of power. Asal's nickname is 'The Raging Bull' which perfectly describes his style of play, very fast-paced and very powerful.
You may notice that both these players are Egyptian and indeed it does seem as though Egyptian players have a particular talent for the dying length.
This may be due to the fact that Egyptian players are known for being experts at playing hard, low shots at a very fast pace, and utilising the mid-court area (in which the dying length needs to bounce).
Anyway, both of these guys are experts at the dying length. Even though they both play it with quite different styles, the two things that make both Momen and Asal's dying length great are their accuracy and timing.
These are the two essential components of the dying length.
Of course, accuracy is probably the most obvious so I'll start with that.
As demonstrated by the difference between Asal and Momen's dying length, this shot can be hit with high amounts of pace, or it can be played more on the softer side.
Different paces have different pros and cons and I'd say that mastering the dying length is all about playing to your own strengths.
Hitting a dying length very hard and low can be incredibly effective as it minimises the amount of time your opponent has to react and get to the ball. However, the obvious compromise is that you might struggle to hit your target of the ball dying.
Especially if you're playing on a hot court, you could easily make the mistake of overhitting the ball and then it may bounce off of the back wall and give your opponent more time.
The key is to figure out how high or low to hit on the front wall based on how hard your hitting the ball.
If you want to play the dying length more like Momen's style, he adds a bit of slice and, although he always gets on the ball incredibly early (which is important), it appears as though he concentrates more on placing the ball exactly where he wants it to go.
I've featured a diagram below of some rough targets in which you should aim to get the first and second bounce to land.
That diagram focuses on the straight dying length, but, if you're wanting to play a cross court dying length, I'd say that the second bounce target is still pretty similar but your first bounce needs to land half way between the T and the side wall.
I think timing is the most important feature of the dying length. If you can master the right time to play this shot, you'll maximise the impact it has on your opponent and also maximise your chances of winning the point.
But when is the right time to go for the dying length?
You can play a dying length from the back of the court, however, if you're at the back it's likely that your opponent is on the T.
Unless it's incredibly tight, I wouldn't recommend going for a dying length in this situation because your opponent can quite easily step across and capitalise on your position at the back by taking it into the front.
I'd say that the best time to go for a dying length is any time your opponent is at the front of the court as they will have to move very quickly towards the back of the court to get to your shot in time. Or, another good time to utilise this shot is if your opponent has to move across the front of you to get to the ball.
I'll break this down into a couple of scenarios in which it will hopefully make more sense.
The first situation in which this shot can work wonders is from further towards the front of the court.
Let's say your opponent just played a slightly weak drop shot and you're moving in to get it, if you get to that ball early and pay a dying length then your opponent will have to move fast to get to it before it bounces twice and will struggle to play any shot other than a boast or back wall boast.
If you go in showing a counter drop to draw them back towards the front, the dying length will be even more effective.
Another situation from the middle area of the court in which the dying length can be used is if your opponent plays a loose crosscourt from the middle of the court and you're on the T.
You can shape up as if you're going to play a short winner or even a really low kill, but then actually play a dying length that lands that bit further back. In this situation, if you've shown that you might play a shot to the front of the court, your opponent will have to move around the front of you to cover that shot.
Then, once they realise your shot is actually going towards the back, they'll essentially be facing the back corner when they try to get it. This puts them in a very tough position where, if they can actually return your shot, it'll again either have to be a boast or a back wall boast.
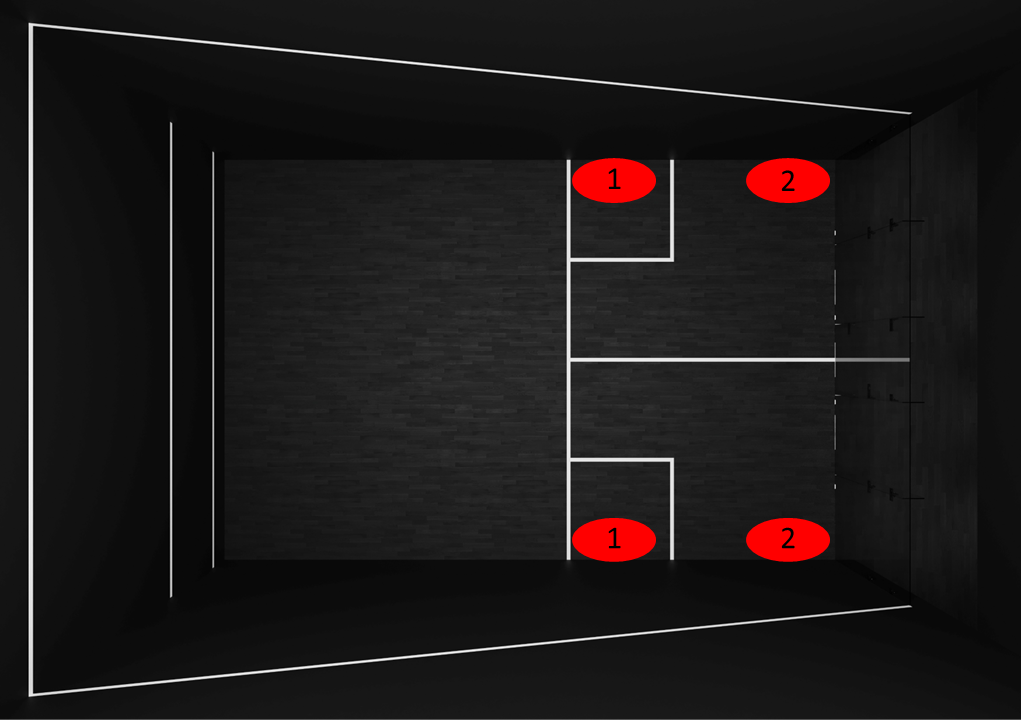
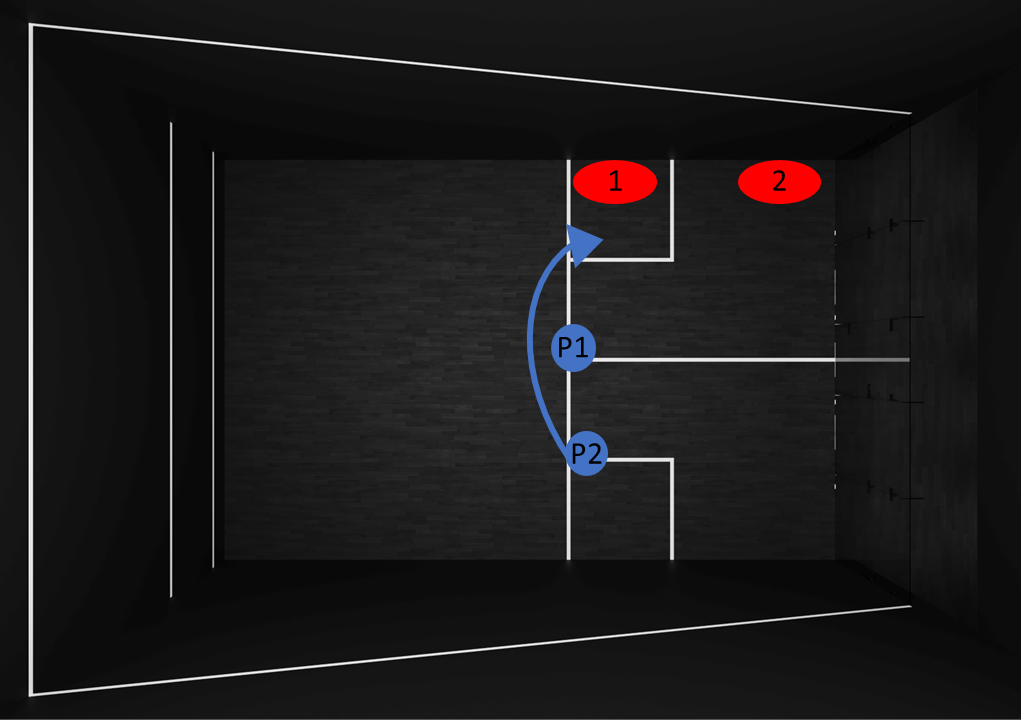
Below is another diagram that hopefully helps explain this scenario.
Player 1 is the blue dot on the T, player 2 is the blue dot on the backhand side and the arrow indicates the movement they will have to take when you volley your shot deeper than they were originally excepting.
Showing a drop or a kill is very important here as it's essential that you get them to move around the front of you.
Another variation of the above situation is if your opponent hits a weak straight drive and you show that you're going to play a straight drop or trickle boast, but then play a cross court dying length instead.
This forces them to move around the front of you rather than behind and they'll have to do a lot more work to try to reach your dying length after taking that route to the ball.
There are a lot of good times to play this shot, but it takes a lot of thought and practice to figure it out.
Now, I may have gone a little too deep in some of these examples, however, a good rule of thumb is that any time your opponent is either in front of you or close towards the front wall is a good time to play the dying length.
Ultimately, if they have to move backwards to retrieve that shot, they really won't have many options.
If you've got a training partner who is willing to feed for you, this is a great way to practice this shot.
Just stick some flat targets down on the court in those locations from the diagrams further up and aim for them, pieces of paper usually work wonders for things like this but if you need something bigger just see what you can find!
Once you've got the hang of the dying length a bit better, start playing rallies with your training partner in which you get extra points for hitting the targets.
Then you can turn this into a full court conditioned game, for example, you could say that if a player hits a shot that bounces once and hits the back wall or hits the back wall before bouncing, they lose the point. Essentially encouraging every drive to be low and bounce twice before reaching the back wall. Other than that the rest of the court is fair game.
But that's just a quick idea. As always, feel free to get creative with your training and try to find routines that work for you and your skill level!