
I did a pretty solid training session with two good friends of mine the other day, and, it got made me realise that I don't think I've ever actually focused an article on training in a three.
I've written a lot about training in pairs or solo, but, training in a group of three is a pretty common occurrence, so, I hope this blog post will be of some help for you all.
Sometimes training as a three is planned, however, it often happens by accident too. For example, you may have been planning to play with a friend as a pair and another player asked to join in, or, perhaps you'd planned to do some training or matches in a group of four and somebody dropped out.
Or, maybe you just arranged to play in a three! Whatever the reason, there are a bunch of great drills that you can play as a trio to help up your game.
One thing I'll mention before I dive in is that my recent trio practice session wasn't particularly well structured, however, we did a lot of very good drills.
So, for that reason, rather than writing up a structured session from start to finish, I'm going to go through some of my favourite different drills to do in groups of three.
I'll try to make sure they cover a range of different skill areas and shots just to help you choose which ones are best for you and your own goals.
Let's begin...
Boast Drive (With Added Options)
It can be tricky warming up in a group of three players and, what often ends up happening is that one player waits on the back door while the two other players end up warming up by hitting a couple of drives back to themselves, and, then hitting a cross-court to their partner to do the same.
Then the three rotate a couple of times so all three get a turn on both sides.
However, I think this routine that I'm going to start with is a better way for all three players to warm up their shots and movement at the same time.
You may have done boast drive before, but essentially, it involves one player in either back corner and one player on the T.
The two players in the back corners play boasts and the player on the T moves into each corner and plays a straight drive to the back.
Then just rotate positions in a clockwise direction and spend a couple of minutes in each position.
This is a good way to get everyone moving at the same time, however, there are plenty of ways to add in more shots and get warmed up even better for the rest of the session.
For example, the first progression that we did during our session was that the players at the back could also hit a straight drive back to themselves followed by the boast, and, the player at the front could hit a straight drop shot and then follow it up with their straight drive.
Then, the next progression was to add in the ability to straight drop from the back corners, and, to play a cross-court drive from the front.
Just make sure to rotate every couple of minutes.
Although this doesn't have to be a warm-up drill, it still should never be too physically taxing, so, if you're starting to struggle, perhaps just one-minute rotations would be a better idea.
Straight Length Practice With A Boast
This is the drill that me and my friends play most commonly in sessions where there are three of us.
It begins with two players rallying with straight drives down one side wall (let's say the forehand side for now).
Depending on your standard, you can be more lenient with what you count as a drive, however, usually when you first start this drill, it's non-competitive anyway and continuous play should be the goal.
However, as a general rule, we usually say that a drive has to land at least the second bounce behind the mid-court line within a service box's width away from the side wall.
Anyway, these two players rally continuously, only playing straight lengths until one of them plays (or is forced to play) a boast. Then, the other player has to go and retrieve that boast and play a straight drive to the other player at the back (who will have been watching and waiting up until this point).
This drill is perfect for procuring your length game, which of course one of the main pillars of squash. It's a great way to practice forcing weaker shots from your opponent using drives.
If you can hold the T position, take volleys, keep the ball tight, and your target of the ball dying in the back corner, you have a good chance of forcing that weak boast from your opponent.
In a match, this would be the perfect time to attack with a kill or a drop, however, since we're just starting this drill, play should ideally be pretty free-flowing (rather than stop and start).
But, once you've done a few minutes of that, you can start adding in more shots and then eventually make it competitive.
With regards to adding shots, you can introduce them at your discretion. It depends on what areas of the game you and your training partners want to work in in particular.
However, we often add in the straight drop first (but only off of the volley), then, we add in the cross-court drive off of the boast, then the counter drop, and then the cross-court drive off of the volley.
Of course, this is fully up to you and your standard as well. If you're finding that rallies are breaking up too often with a lot of stop-star, then perhaps you introduced one too many new shots and it's time to simplify things a little bit again.
We had this very thing happen when we tried to introduce the straight drop shot off the boast (however, the catch was that the player who played the boast also had to move into that opposite front corner and retrieve the counter drop, which was a lot of court to cover).
This brought in a lot of extra leg work and we found that rallies were stopping a little too frequently as a result.
But, I would assume that for players a lot better than myself and my training partners, the introduction of the counter drop off of the boast wouldn't have been too much of a big deal.
It's all about making sure you're getting the most you can from the training session (rather than making it as hard for yourself as possible).
However, once you've settled into a rhythm and everyone is used to the drill, you can start to make things competitive (if you so wish).
Rather than being able to win points in this drill and playing up to a certain number, we tend to play by starting with a certain amount of lives (usually around five) that you lose every time you make a mistake.
So, if you go for a drop and hit the tin, you would lose a life. Or, if another player hit an incredibly tight length and you couldn't return it, you'd also lose a life.
It's a good way to spice things up a bit and introduce that element of competition that makes these types of drills closer to resembling a real match situation.
The added pressure of losing points can make it more difficult to execute your shots accurately and consistently, so, it's important to practice under pressure!
Three In A Line
The 'three in a line' drill is one of the less common drills that trios tend to play. I'm not sure why that is, perhaps it's not as well known, but, I think it's great for speeding things up and testing reactions.
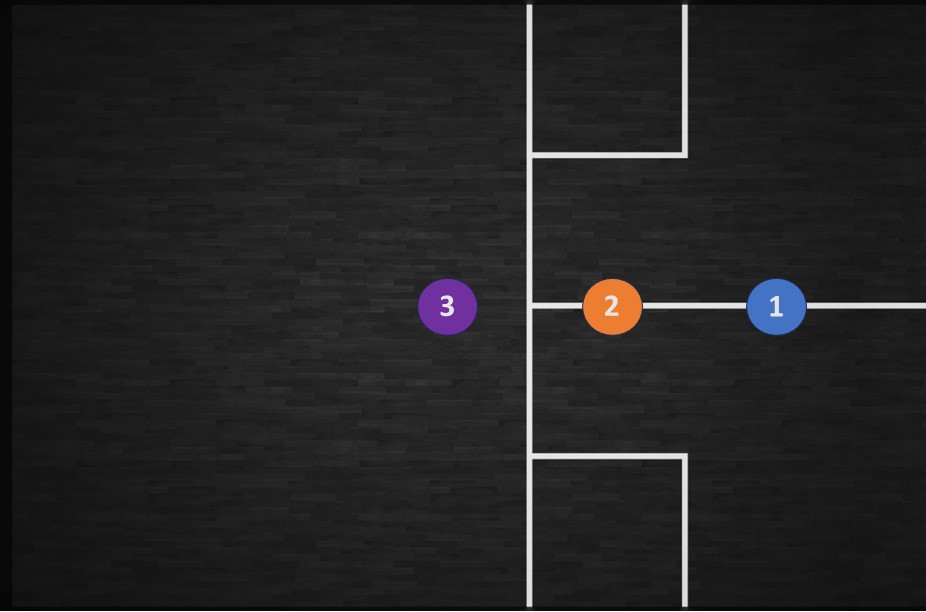
It's a little hard to explain this drill using just words, so, I've created a little court diagram further down to go through things a little easier and depict the positioning of each player.
Basically, player number one can only play boasts or straight drop shots and player three can play straight drives or cross court drives.
Then, the role of player two (or the player in the middle) is to try and read player three's shots and step across to intercept them with a volley. Player two can only play volley straight drops or volley straight drives.
To start the drill off (and keep it as safe as possible), player number one starts every rally with a boast, from then on, each player will move to either side for their shot, and then back to their position in the middle.
As you can imagine, this drill is quite a bit more fast-paced than the first two I mentioned, however, I think that the benefits to all three players can't be understated.
Player number three (at the front of the court) gets to practice playing more attacking lengths and cross courts from the front of the court.
Plus, since there's the added threat of player number two picking off their lengths with that volley, they're forced to make sure every straight shot is too tight to volley, every cross court is too wide to volley, and, they can also experiment with deception and holds to make it harder for player two to reach their shots.
Player two also gets to work on their reaction speed. It's a very powerful skill to have to be able to take balls very early while still having to control the ball.
Then, player three also gets a bit more of a rest as they have a lot more time on the ball if they want it. Plus, of course, they get to practice their boasts and straight drops from the back of the court.
Rotations for this drill should be a little shorter. A minute in each position before switching will probably do the trick.
This drill is a great one for adding in lives to make things a little more competitive.
Three lives each before switching will probably be perfect here!
Two vs One
This one is a little more straightforward. Two vs one is a great one to do towards the end of a trios training session as it takes the things you've practiced a lot closer to a real match situation.
There are a few ways to do two vs one. The format that a lot of people seem to go for is to play a full game (up to 11) with one player on their own and the team of two situated with one on the forehand and one on the backhand, then rotate so each player gets a go on their own.
However, this makes things very tough for that player who is on their own for a long period of time, so, personally, I like to do two vs one slightly differently.
I think that the best way is basically to switch whoever is playing as the one every time they lose a rally.
So, there will be the team of two (with one on the backhand side and one on the forehand side) and one player on their own until they lose a point.
Then, that player who was just on their own rotates to the backhand side, the player who was on the backhand moves to the forehand side, and the player who was on the forehand side is now on their own instead.
Since it's a lot more physically demanding for the player who is on their own, the goal of this format is that nobody dominates when they're on their own, as, the longer they're on their own, the more tired they will get, meaning that they should eventually concede a point and have to rotate, giving the other players a chance to accumulate some points.
That was a bit of a mouthful, but, hopefully, it makes sense!
There's not too much more to add to two vs one. It's just a great way for all three players on the court to be in continuous play, plus, the competitive side of it forces accuracy and consistency from all players (but especially the one).
Full Court With Conditions (Get The Targets Out!)
This is nearly always the drill we end our trio sessions on. It's essentially full-court rallies with one player standing against the back door.
Just briefly, from a safety perspective, that player on the back door needs to be ready to move out of the way of the players and the ball if it comes too close to them (to make sure they don't get hit).
Anyway, you then rotate after every rally with the loser swapping with the person on the back door and the winner staying on to play another point.
You can play up to any score you want.
However, more often than not, we put targets down and/or introduce conditions when we play full court games, and, I would urge you to do the same!
I always advocate putting targets down when I write training-related newsletters, and, maybe this is something I should have mentioned further up, but, you can put targets down for pretty much all of the drills I've mentioned above.
The best target to use for the more continuous drills (that aren't as competitive) is paper as the rallies don't stop if someone hits the target.
But, when it comes to full court games where points are at stake, we usually put shoes or water bottles down as targets, because, the rules we add imply that the rally ends if somebody hits the target.
I used to say that the best place to put targets is tight against the side wall a racquet's length away from the back line of the service box, however, I've changed that positioning slightly recently.
Now, I have my targets about half a racquets length behind the service box line. I made this change because I think that's where you want to aim if you want your length to die or bounce twice before it reaches the back wall.
Anyway, in this particular drill, if a player hits the target, they get three points, and, if they hit the target on the volley, they get five points.
That's a pretty big incentive to hit the target!
With those point bonuses in mind, it's usually better to play up to a higher score like 21 or 31. Just think, if you were playing up to 11, there's a chance somebody could win in just three rallies, which is far too fast (however, it would be very impressive)!
If you're more interested in focusing on improving other specific areas of your game, then you can add in conditions.
If you're looking to improve the accuracy of your shot selection, one of my favourite conditions is to say that each player is only allowed one shot to the front of the court per rally.
Once you've used it, that's it, every shot has to land in the back of the court.
Or, if you want to work on your defensive play, another option for a condition would be for every shot to hit above the service line.
Also, the beauty of conditions is that all three players can have different ones depending on what they work on.
There are pretty much endless opportunities to experiment with different restrictions in these kinds of drills, that's why they're so much fun!
This article was taken from our On The 'T' Newsletter, if you're interested in receiving more content like this, please feel free to sign up using the subscribe section located at the bottom left of this page (or underneath the article if you're on mobile), thanks!